Saturday, May 18, 2013

Teamcenter POM Query


POM Query is one of important ITK  module in teamcenter from perspective on Data extraction and performance. Teamcenter POM query is API layer provided to query database through API rather then  direct query in database, as Teamcenter doesn't officially expose the underline database design. Developer often prefer to use POM Query rather then going for sets of ITK api to get the desired object from Teamcenter because of performance factor as well using one set of call for getting desired object. Once you understand POM Query mechanism it is very easy to implement complex query cases through it rather then going through lengthy set of ITK API calls . In this blog I will give basis of POM query. With this basic understanding you can build complex query through it. I am assuming the reader will have basic understanding of Teamcenter Data Model. If not please refer my previous blog on Teamcenter Data Model

Introduction 
POM query is noting but sql query which wrapped around ITK program for extraction of data from teamcenter database. I will explain  POM query through simple SQL example which we will convert to POM query. Let assume we want to extract some item based on specific item id and item type . If we want to do it through SQL query, the sql statement look like this
Select puid from item where itemid = “1234”  and object_type = “Item”;
So there are three main constituent of any sql query.
  •   Select (attributes)
  • From (table)
  • Where (condition)
    • And /OR

SQL statement  is a function, constituting above three aspect. If you want to covert the above statement in to POM query, all the above aspect formS the building block for POM query.
Following are basic characteristic of POM Query.

  • POM Query has unique identification.
  • POM query will have select attribute from  POM Classes
  • POM Query has expression which specified where condition
  • All expressions are binding through POM query API with logical clauses
  • POM query required to be executed to get the results
Steps for building POM Query

  1. Create the query by unique name
  2. Add select attribute on POM query by defining attribute and corresponding POM class
  3. Build the  query with all specified expression\condition against query identification.
  4. Bind the expression through logical value .
  5. Execute the query and get the results.
  6. Delete Query
Let see how the sample sql statement can be converted to POM query

Create Query
Unique identification for query
POM_enquiry_create (“get_itemid”)
Teamcenter identify  query through unique string name in a given session. Hence it is good practice to clear the query after it is used.

Select attributes
const char * select_attr_list[] = {"puid"};
POM_enquiry_add_select_attrs(“get_itemid”, “Item”,1,” select_attr_list)
The above api set the select attribute agaist POM Class (It item in this case). You can have multiple attribute defined for select attributes in array and specified that in api. We defined 1 as we have only select attribute in our case.
Build Expression
const char * itemid[] = {"1234"};
POM_enquiry_set_attr_expr(“get_itemid”, "ExprId1", "Item", "item_id", POM_enquiry_equal, “valueId1”)
POM_enquiry_set_string_value (“get_itemid”, "valueId1", 1, itemid, POM_enquiry_bind_value )

The above set condition expression of the query. This is equal to item_id= ‘1234’. The expression is identified  by unique string  identification  which in this case is ExprId1. The value required to be binding through unique identified because of different data type binding. The value identifier valueId1 is then binding by value through proper API call based on attribute type to which it is binding. In our case binding is with string attribute, hence we call set_string_value api. If you have any other data type for attribute  then you have to  call appropriate API. Following data type are supported for POM Query.

Int  : POM_enquiry_set_int_value
Double : POM_enquiry_set_double_value
Char : POM_enquiry_set_string_value
String : POM_enquiry_set_string_value
Logical POM_enquiry_set_logical_value
Date : POM_enquiry_set_date_value
Tag : POM_enquiry_set_tag_value

This expression is binded by query by providing query identification which ‘get_itemid’ in our case. Similar expression will be for other condition of object type
 const char * itemtype[] = {"Item"};
POM_enquiry_set_attr_expr(“get_itemid”, "ExprId2", "Item", "object_type", POM_enquiry_equal, “valueId2”)
POM_enquiry_set_string_value (“get_itemid”, "valueId2", 1, itemtype, POM_enquiry_bind_value )

Expression Binding
Now the two expression should be combined for where clauses. The logical binding between expression is done through api call
POM_enquiry_set_expr(“get_itemid”, "ExprId3", "ExprId1", POM_enquiry_and, "ExprId2")
The above api will bind ExprId1 and ExprId2 with and clause. This is equal to
itemid = “1234”  and object_type = “Item”;
To identify the binding a new expression id is created. This expression id can be used now to develop complex binding if there are more then two condition clauses.
Expression can be binded by and, or and not condition. This is similar to sql condition binding.
Once the expression binding is completed, then we required to put as where clause in expression. This is done by calling API
POM_enquiry_set_where_expr(“get_itemid”, "ExprId3")
This set the where clause against expression ExprId3 which in binding expression for ExpId1 and ExpId2.

Query Execution
The above steps completes POM query which is now equivalent to SQL query. Now query required to be executed. Which is done by calling API
POM_enquiry_execute(“get_itemid”, &rows,&cols,&results)
Where row, col and report are output. 
rows : number of results.
cols : Number of column for each result
results : result of query in two dimension array. This is array of void pointer
The above binding can be better understand by below diagram.


Once query is executed and results are stored in array, they required to extracted and type cast for specific type based on select attributes provided for POM Query. For example is above case we extracted puid which is nothing but object tag. So we required to convert our output to tag pointer. Below psedo code shows how to extract and store it in tag array.
if(rows > 0 )
      {
            int reportrow = 0 ;
            tag_t *objs = Null Tag
            (objs) = (tag_t *)MEM_alloc( (objs), ( rows) *sizeof(tag_t)));
            for ( int i= 0; i< rows; i++)
            {
                  (objs)[i] = (*(tag_t *)( results [i][0]));
                 
            }
           
      }
Once results are stored after type cast then this object can be used as a any tag object id in teamcenter.

Delete Query
After executing the query and storing the result in appropriate object type we required to delete the query. Remember the each query is unique and identified through its string name. If we don’t delete the query, then query will remain in given state in a session and again if it hit same code it will trough a error as query with the given name is already registered in a session.

POM_enquiry_delete ( “get_itemid” )

That’s all for introduction POM query. Once you understand basic of POM query, you can implement various complex query by joining two tables and having multiple expression hierarchy. Most of the SQL statement can be converted to POM query. I suggest for complex query better to first visualize in term of SQL statement and then design POM query.

Sunday, April 14, 2013

Teamcenter Data Model

Data Model is core of any Packaging software. To have a good technical command in any package, it is important to have a good understanding of its Data Model. Teamcenter is no difference with it.  In this blog, I will explain basic data model of Teamcenter as well corresponding schema in Database. This will help people new to Teamcenter to have a better understanding of Teamcenter system.
Teamcenter Data model can be categorized in to three distinguish layer. They are
·         POM or Schema Layer
·         Business and Relation Object Layer
·         Business Rules
POM or Persistence Object Model is lowest layer, which basically represent mapping for underlying Data Base of Teamcenter. It is not always one to one mapping, but closest to DB Tables for most of classes. Developer should know detail aspect of POM layer for customization and extension of system.
Business and Relation Object Layer resides above POM layer. This layer represents actual entity to Business and its process. Mainly Business Analyst or Solution Architect interacts at this layer.  Business Object and Relation defines overall Data Model from Business process perspective.
Business Rules are the top level layer of Data Model. This layer basically constitutes Business Object behavior based on the rules configured in BMIDE. Business rules along with Business Object encapsulate overall PLM business process. Teamcenter provided both configurable like naming rule, conditions etc or custom like extension for defining business rules.
Below diagram shows the basic building block of Teamcenter Data Model.
 

POM Schema of Teamcenter Data Model:
Teamcenter Data Model Schema is hirierachy based, it means there is base level object through which all the object in the stystem are derived. The base object in Teamcenter is called POM_object. It is base parent object for all object defined in Teamcenter. POM level object  are represented as tables in Teamcenter data base. All derived class of Teamcenter Data Model is represented as corresponded table in data base. Under POM_object classes there many immediate child classes which are mainly used as storage classes like form storage class. Out of which one important class is POM_application_object class. This is important class from perspective of it actually representing all Business object of Teamcenter.  Workspace object which represent as parents of all objects which user can see in the teamcenter is derived from POM_application_object class.
All Business classes in Teamcenter either directly or indirectly (through hierarchy) is derived from workspace object. For example Item class is derived from workspace object. Same is valid for Folder, Dataset or ItemRevision. Below diagram shows the class hierarchy for basic workspace object.
 

Most of time you create custom type by extending data model of Item or form type. Once deploy from BMIDE, it will create a new table in Data base with columns having custom attribute defined in BMIDE. All inherited classes automatically inherit parent attributes. Hence child attributes are combination of parent attributes plus child attributes.
Business Object:
The building block of Teamcenter is Business Object. It resides above POM Objects or DB Classes. Business Object can be seen as actual representation of real life entity which are encapsulated as Business object. The underlining objects are still persistence schema classes.  Teamcenter UA provides hundred of OOTB business objects. Following are major characteristic of Business Object.
1)      Business Objects are related to each other through relations.
2)      Business Objects have property which can be persistence (attributes from underlining classes) or Dynamic (evaluated run time).
3)      Business Objects behavior can be controlled through rules which are defined in BMIDE. Rule can be either configurable (Ex: Naming Rules) or customization (extension, user_exit etc).
GRM Relation: Teamcenter Relation is second building block. Relation defined the inter dependent of various Business Object with each others. In Teamcenter Relation can be categorized in to two groups.
a)      Reference by : The Business Object underline schema classed direct has reference to other object through attributes. It can be compare to pointer reference to other classes in object orient concept. For example POM_application object has reference to owning group or user.
b)      GRM Relation : Other way relation between is created by creating a relation object which encapsulate both Business object through concept of primary and secondary object. Advantage of using GRM relation rather than direct relation is that of having more flexibility in term of defining business rules. For example you can define DeepCopy Rules or GRM Rules. Also different relation type object can be created to defined different Business rules.
Property:
Properties define business objects. All attributes which are present in underline POM Class for given Business Object are automatically become property of Business Object. Apart from persistence property, there are other properties which are either derived from other relation object or created run time by writing custom codes. Teamcenter property can be classified in following four categories.
a)      Persistence Property: Attributes which are stored in database. This are defined in underline schema classes.
b)      Compound Property: It a property which basically propagates property of other object which is related to target business object through either reference or relation. Example of this can Form property shown at Item or Item Revision.
c)       Runtime Property: These are property define dynamically through custom code. The custom code required to be written, which executes when the property value is fetch from server.
d)      Relation: This is property which defines relation between target object and source.
That’s all from Teamcenter Basic Data Model Perspective. Hope this provide good starting point  for people who want to understand Teamcenter Data Model.


Saturday, February 9, 2013

Teamcenter SOA : Detail Steps for SOA Creation


This blog provides detail steps of creating your own SOA. The SOA service provides all the query  present in Teamcenter Query Builder. The SOA has one Operation which gat all query object in Teamcenter. The Operation doesn't take any input argument, it return list of Query Objects encapsulated in custom Data Structure.


Detail Steps :
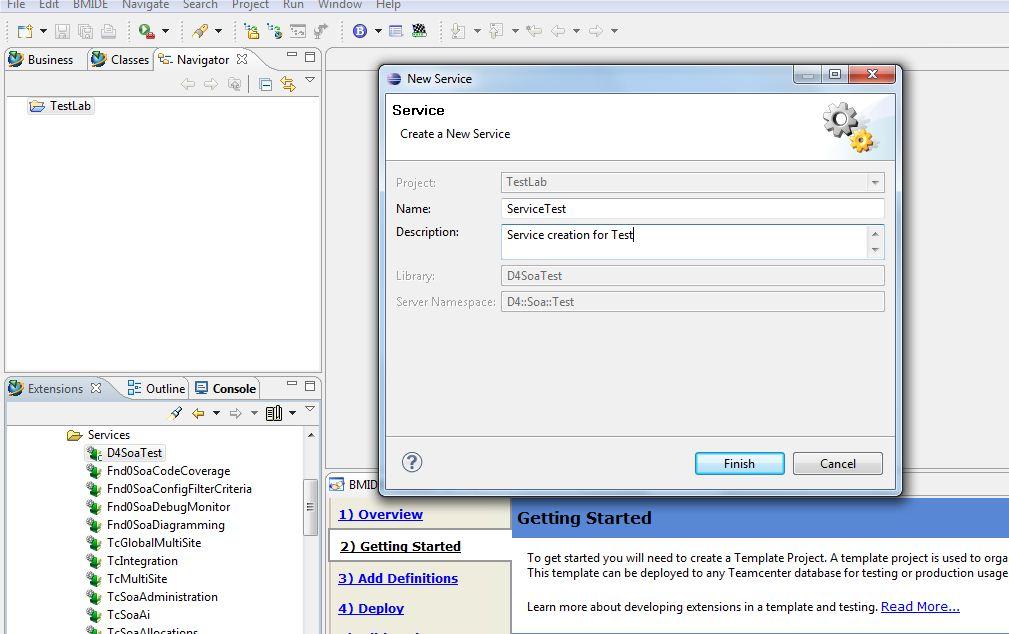
  1. Create a new service library in BMIDE Extensions tab by selecting Project->Code Generation->Services

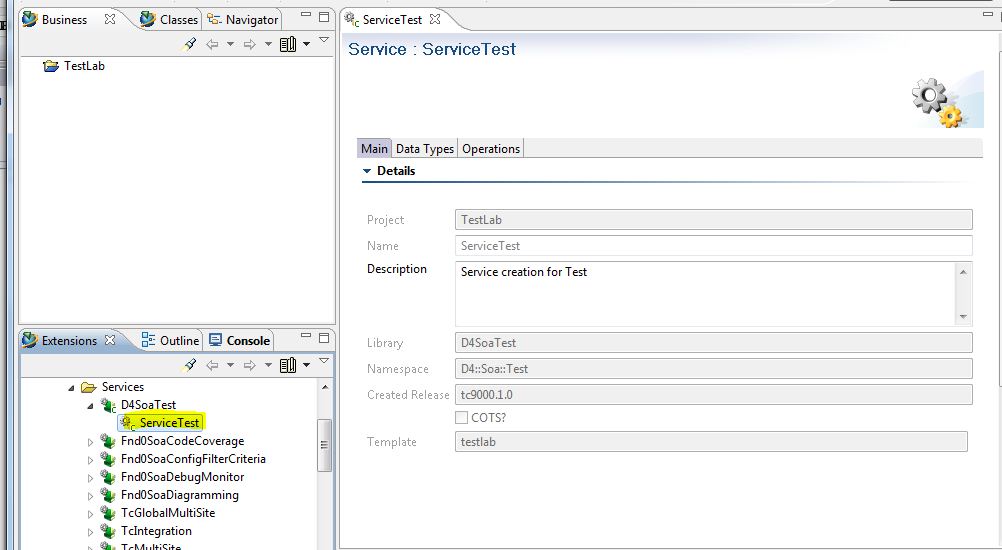
  1. Select the newly created service library (Ex: D4SoaTest) and create new service
  2. Open the new service (Ex: ServiceTest)
  3. Define the DataTypes and Operations as per the requirement. Ex: Operation is to get all the saved queries. Define Data Types as below
Define data type TestQueryObject

    1. Click on Add button in the Data Types tab
    2. Select Structure and click Next
    3. Enter name as TestObjectQuery and description for it
    4. Select DataType elements by clicking Add button
query->Teamcenter::ImanQuery [holds the query tag]
queryname->std::string [holds the name of the query]
querydescription->std::string [holds the description of the query]

Define data type TestGetSavedQueriesResponse – Used for as return data type in operation which returns vector of query objects holding query tag, name and description

    1. Click on Add button in the Data Types tab
    2. Select Structure and click Next
    3. Enter name as TestGetSavedQueriesResponse and description for it
    4. Select DataType elements by clicking Add button
queries->Vector of TestQueryObject
services->Teamcenter::Soa::Server::ServiceData

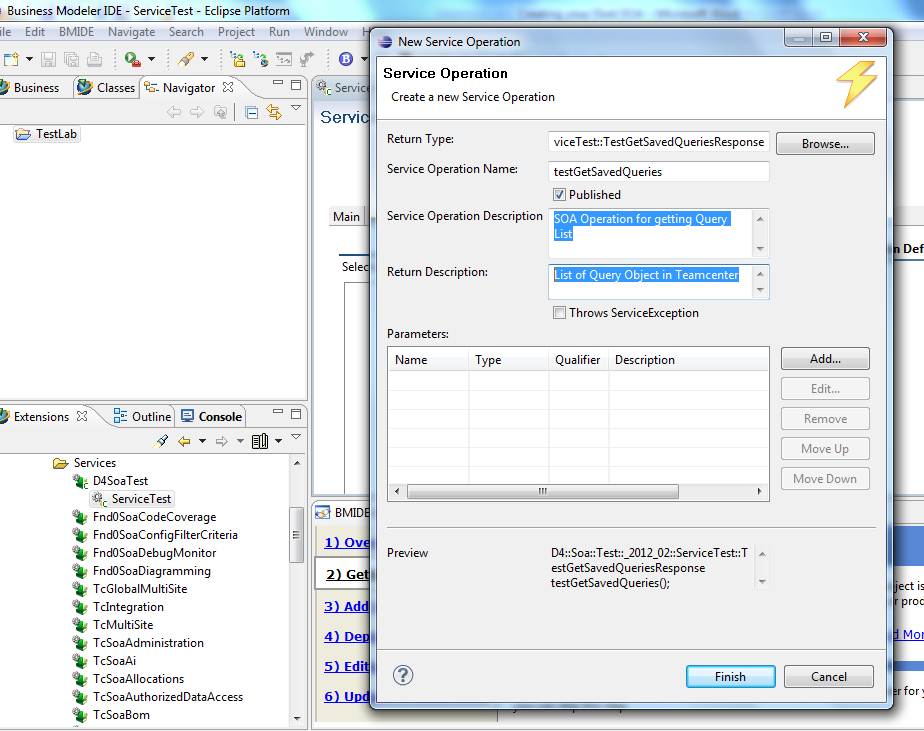
  1. Create Operation using the above defined data type. Select Operations tab of the service (Ex Test Service). Click Add on to create new operation.
    1. Click on Browse button of New Service Operation dialog
    2. Select D4::Soa::Test::_2012_02::TestService::TestGetSavedQueriesResponse as the return data type
    3. Enter Service Operation Name: testGetSavedQueries
    4. Enter Service Operation Description: SOA Operation for getting Query List
    5. Enter Return Description: List of Query Object in Teamcenter
    6. Click on Finish


  1. Once the Operation is created, in Operation Tab when Service is opened.
  2. Save the datamodel.
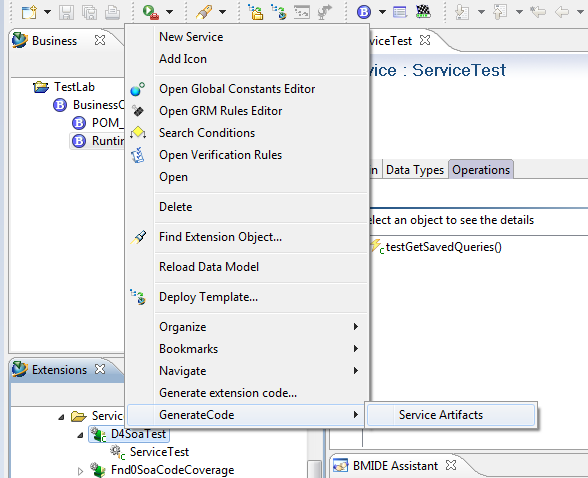
  3. Select the library created (D4SoaTest). Select  GenerateCode->Service Artifacts


  1. Check the Console view to know if the code generation is successful or errors in other case.
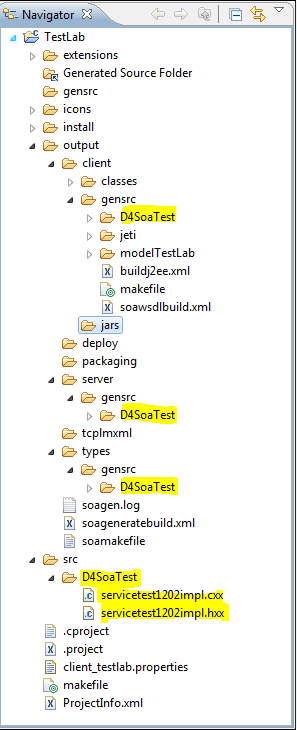
  2. Source and header files corresponding to each service are created. They are placed in the following path in Navigator view:
Project->src->server->LibraryName
Ex: AccentureTest->src->server->D4SoaTest (This folder contains the files which need to be implemented by the developer)
Project->output->client->LibraryName  - This contains the auto generated files for the client (no changes required to these files)
Project->output->server->LibraryName  - This contains the auto generated files for the server(no changes required to these files)
Project->output->types->LibraryName  - This contains the auto generated files for the data types that are created. (no changes required to these files)
Inferences:

  1. Name of the service library:    D4SoaTest
  2. Services in the library D4SoaTest:

  1. TestService

  1. Operations in the service by name TestService:

  1. testGetSavedQueries


  1. Open the source file and enter the required code. Shown below is the file generated in the step #8. Operation ‘testGetSavedQueries’ is high lightened for a quick notice.


  1. Build the project. Dlls are generated in
    1. Project\output\client\jars  (Project\output\types \lib if its c++ bindings) – jars files to added to java client classpath
    2. Project\output\server\lib (libraries which would be copied to Teamcenter Server TC_ROOT\bin)
    3. Project\output\types\jars (Project\output\types\lib if its c++bindings) contains the types definition  – jars files to added to java client classpath
Note:-

  1. Check console to see a successful build message
  2. libD4soatypes.dll under types\lib and server\lib are same.
  3. Ensure the dependant libraries are added to the library definition. Ex: query module is used in the D4SoaTest library and hence added to the D4SoaTest library definition.

  1. Deploy the data model.  This will deploy the library, service and operation definitions in the template to the database as well as it copies the built server libraries to TC_ROOT\bin. Ex Project\output\server\lib to TC_ROOT\bin

You can now call your SOA at client site in a same way as you called sample SOA. 

Teamcenter SOA : Create You Own SOA

In my last two blog I discussed about basic fundamental of SOA and how to use OOTB SOA in client side. In this blog we will discuss about basic for creating your own SOA. Usually new SOA service is required to be created when you don’t find OOTB SOA satisfying your requirement or what to have the service behavior in different way. Following are the guideline for creating your own SOA.
1)      Check whether you can achieve the required result at client side by using OOTB SOA.
2)      Analyze the desire state of transaction between Client and SOA server layer. For example you have to look whether transaction should be committed in one request or multiple request provide by OOTB SOA is acceptable.
3)      Analyze what service you want to implement. Whether it will be single request base or multiple requests which satisfy the use case.
4)      Analyze what input to perform the service. This will help in defining input data type.
5)      Analyze what output will be provided for requested service and how the output will be used. This will also help in deciding whether you required having loose or strong binding.
Before You Start:
Before start you should understand some aspect of SOA service in teamcenter.
Loose vs. Strong Binding: The binding define how the data map between SOA server and Client.  Loose binding mean Key/Value pair mapping as string map of data and its value. Whereas strong binding means the client data model is populated with typed objects that correspond one-to-one with their server-side object type. Hence decision required to be taken based on use case. For example if SOA service is for creating some static reports then loose Binding can be good option and for integration strong binding is good option.
Data Type:
Data Type defined encapsulation of Data while creating a request for SOA service as well getting output from SOA service.  In SOA you can define data type either of Structure, Map or Enumeration. Meanings of this Data Types are same as in a programming language like C or Java. Structure defines set of basic data types encapsulated in structure. Similarly Map is data container.
Operations:
Operation defines set of function which will available to client for created a request for services to be performed. The SOA service can be either defined through single operation if it is a simple service or set of Operation if it is a complex use case.
Creating SOA services:
As you understand the basic building block of creating SOA, we are ready for creating your own SOA service in the BMIDE. The detail of steps of creating SOA service is given in this blog. Following are the steps of creating SOA service
1)      Define preference binding. For example for Java you can select loose or strong binding.
2)      Create new SOA service library or use existing if you already have one.
3)      Create new service under SOA service library.
4)      Define all the data type which will be used for SOA Operation.
5)      Defined all the Operations with define data type. The Operation will have input data type and return data types. Data Type can be either defined data type or OOTB data types.
6)      Generate code in BMIDE by selecting Generate Code -> Service Artifacts. This will create stub code for both server and client side (see step blog for detail).
7)      Implement the server side code for all defined operation in BMIDE. The stubs for all Operation is already created by BMIDE and only required to implement the business logic for the Operation.  Server side implementation is always in C++ and ITK API can be used for implementation.
8)      No implementation is required at client side.
9)      Build the BMIDE project. Jar file created for the client (if it is Java Binding) and dll for server.
10)   Deploy the server dll in TC_ROOT\bin directory.
11)   Implement custom SOA service in client side. The process is same as defined for OOTB service in the Blog. Only addition will be to add the client SOA jar file in the Class path for using Java client and client dll if using c++ binding.


The detail steps is given in Steps for creating SOA.
These close my series on Teamcenter SOA. I thanks my friend Bhaskar for introducing me to Teamcenter SOA Framework.
Hope this blogs will help good foundation for all people who want to learn Teamcenter SOA services  and serve as quick start on for using and creating own services.


See Also :


Sunday, January 6, 2013

Temcenter SOA : Sample SOA Code Setup

In this blog I will provide detail step for setting up sample SOA code provided in install image file under SOA zip file. Below steps is for Java SOA sample code.

1.       Unzip soa_client.zip from install image to TC_ROOT directory. It will create soa_client folder under TC_ROOT.
2.       Install Eclipse 3.6 and launch
3.       Add ClassPath variable for the root location of the soa_client folder.  
Open the Preferences dialog of eclipes (Window --> Preferences ... ).
Select the ClassPath Variable tab ( Java --> Build Path --> ClassPath Variables).  
Add the variable 'TEAMCENTER_SERVICES_HOME', set it to the root path of the 'soa_client' folder


4.       Import the project
Open the Import dialog ( File --> Import... )
Select Existing Project into Workspace (General --> Existing Projects into Workspace )
Click Next, then browse to .../soa_client/java/sample, select Finish

Note:- While importing FileManagement sample, FMS_HOME need to be added just like TEAMCENTER_SERVICES_HOME

5.       Compile the project 
If the IDE is not configured to Build Automatically, force a build of the project

6.       Execute the client application
Open the Debug/Run dialog ( Run --> Debug ...)
Select the HelloTeamcenter Java Application
The launch is configured to connect to the server on http://localhost:7001/tc to change this URI on the Args tab.

If the connection is http, ensure its pointing out to the right URI and this can be checked through Run->Debug Configurations-> Arguments

If it the connection is through iiop, it should be set as follows

-Dhost=iiop:localhost:1572/TcServer1


Note:- Only Java and C++ bindings work in 2-tier mode.

7.       Go through the files to understand how the services are being called and can be used in the custom solution. Refer my OOTB SOA Service Blog for basic understanding of sample code.
 See Also :

Saturday, January 5, 2013

Teamcenter SOA : Using OOTB SOA Services

In last blog I have given introduction to Teamcenter SOA service. In this blog I will provide detail of using OOTB SOA services provided by Teamcenter. Teamcenter provide set of core SOA Framework class for login , Error Logging, Object Model Change framework etc. Apart from core Framework API teamcenter also provide set of SOA service for all modules like Workflow, Change Management, Query, Structure Manager etc. The detail of all API and SOA service can be found in BMIDE in Extension view under Code Generation - > Services.
Process of using SOA Client:
Teamcenter provide SOA framework for creating SOA session and using publish SOA services. For implementing SOA client required following steps.
1)      Implementing Login Credential and session Class encapsulation connection.
2)      Using published SOA service.
3)      Optionally using other Framework services like Object Model Changes, Exception handling etc.
I suggest going through the sample program provided in SAO_client.zip.  I provided the detail of setup step for sample code in this blog.
For using SOA service first thing is to connect to Teamcenter Server with two tier (iiop connection) or four tier  (web URL). Teamcenter SOA framework encapsulates most of connection implementation through com.teamcenter.soa.client.connection class and only required credential management through implementing the CredentialManager interface.
The SOA client can implement either in .NET,C++ or Java. First step is to get the connection instance for SOA which is done by creating connection instance

url is connection string for two tier or four tier server connection. credentialManagerInstance is a instance of class which implemented CredentialManager interface.
public class AppCredentialManager implements CredentialManager

Calling SAO services:
Teamcenter provide set of OOTB SOA service for different modules like work flow etc. Each of this service has its own static service class which provide handle to those specific services. For example Query service handle can be get by
SavedQueryService queryService = SavedQueryService.getService(connectionObj);
Or workflow service instance can be obtain through
WorkflowService wfser = WorkflowService.getService(connectionObj);
connectionObj is the connection instance which we created above. Similarly there are other several services for different functionality. Detail of all services and its operation detail can be seen in BMIDE as shown in below images.


The above image show the SavedQuery and available operation for it. Once we get instance on query service we can invoke all available SOA operation on it. The detail of all operations functionality and its argument Data Type is describe in BMIDE.
Quick Example of using SOA service:
Let look small code snippet of using OTTB SOA service in Java. These below code release the object using operation from TcWorkflow SOA service.


The above code release given object by calling Teamcenter SOA service. This are basic step for doing any SOA service call.
1)      Get Instance of required SOA service by providing connection object.
2)      Prepare input argument Data for requesting for specific services.
3)      Call the specific Operation for achieving the  required results.

In above example we get first WorkFlow service instance. Then we prepare input argument by creating release options object, release input object and populating them with appropriate value.

Note the most of Argument for SOA API takes as array value and return are also in array. The reason for this is that Teamcenter SOA is design is such a way that it takes bulk request (in an array) in single operation for avoiding multiple calls to server from client.  Hence in SOA implementation we have to first create instance of object and then encapsulate them in Array.
I hope the above blog will help you to understand basic aspect of using OOTB SOA services. 

 Also See :
Teamcenter SOA Introduction
Temcenter SOA : Sample SOA Code Setup

Teamcenter SOA : Create your Own SOA
Teamcenter SOA : Detail Step for Creating SOA